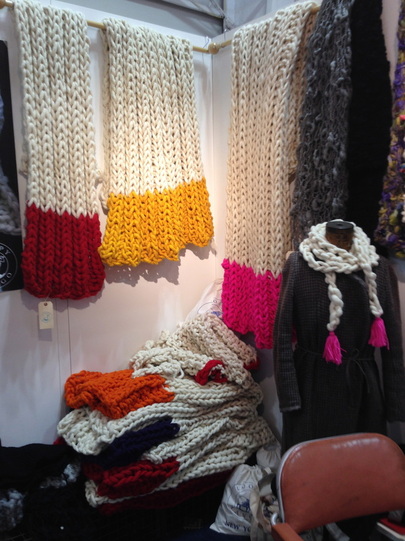
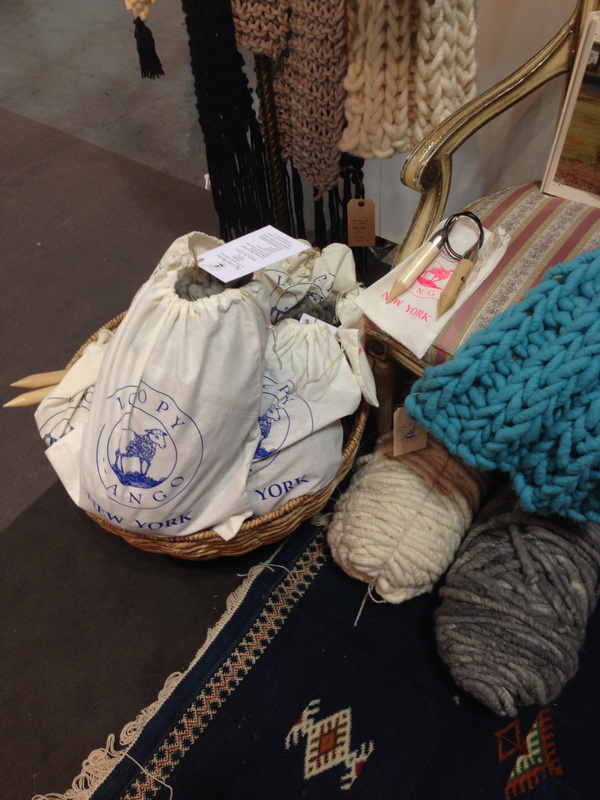
I have this attraction to knit items, things with cable knit patterns, anything chunky and wooly looking. I don't remember if I've mentioned this before, but I'm basically allergic to wool. I can't wear sweaters with wool, even 10% wool content, for more than a miserable hour or two and cashmere is like sandpaper (truly) to my skin. I'm always drawn to clothing and home goods that incorporate chunky, woolen textures—I'm sure there's a psychological term for this. So of course when I saw these big, bright throws, I had to stop. Loopy Mango, which also has a brick-and-mortar shop in Soho, was founded by two women who met at FIT. All the yarn is produced at the company's mill in Massachusetts and all the finished knitted products are handmade in NYC. 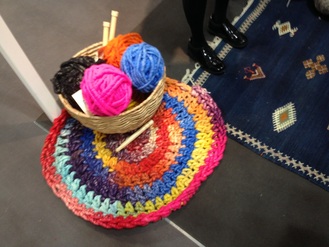 I love the Aspen Crochet Round rug, which unfortunately for me, only seems to come as a DIY kit currently. The kit is available in 20 individual colors but they also sell yarn on their website so you can choose additional hues if you wanted to recreate something something more mult-colored like this rug I saw at the gift show. The solid colored rugs are really chic and gorgeous, though. The super-chunky finished throws come in eight colors, but again, you can buy your own yarn. They also offer custom sizes and designs upon request, so you can likely ask for a throw in any of the colors they offer. In addition to various DIY kits, Loopy Mango also offers several free patterns on their website, in addition to links to their YouTube tutorials.
images are my own Xx a
0 Comments

Over the weekend I helped my four year old make her valentines for her preschool class. Last year she was the only one that brought in handmade valentines. I know how busy everyone is, and it's certainly just easier and quicker to sign names on the pre-made cards with popular characters on them, but I'm really glad that we're still making our own, at least for now. 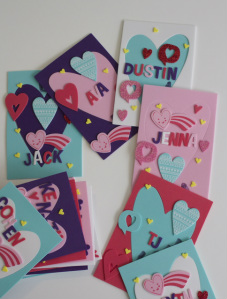 my daughter's valentines my daughter's valentines My daughter is really into art projects and sticker crafts. Every time I go through the craft store, I grab a pack of foam stickers so she can do her creative work. I saw this pack of foam valentines and stickers at Target for $5 and brought them home for her. I helped her a little, but I was really proud of how she carefully put her friends' names and the decorative stickers on each one. We had some pieces left over, which I obviously commandeered to make the valentine above. Last year, I found card stock shaped like large cupcakes (always a cupcake theme with her) and we put each kid's name on it in white foam stickers. Then I wrote "You're sweet, happy Valentine's Day" and then she signed them. Craft stores always have paper or foam in fun shapes and most have adhesive backing so you don't even need to mess with glue if you don't want to. I know there are a zillion cute ideas on blogs and Pinterest, and I really do like the one that looks like your child is busting a lollipop through from the second dimension into the third, but I think sometimes attaining (or thinking that you need to attain) that styled perfection can be more stressful than inspiring. If you're not into commercialized characters (I'm not) or spending a fortune and you want to spend a little extra time doing something hands-on with your kids, here are three ideas I literally came up with this morning while fully intending to post links to other people's great ideas. Parents of young ones probably have most of this on hand. I did not shop or pre-plan for this (which may be obvious when you see them), every last bit came from something I already had in my house. I've mentioned before I'm not super-DIY girl, so these are pretty simple. But that's the thing - these are little kids, they're not trying to reinvent the wheel. They just want to have fun: To them, punny sayings are still novel and giggle-inducing. And making something themselves gives them a sense of pride and extra practice on the motor-skills. So give yourself a break, mom and dad, and if you want to shoot for something slightly more ambitious than store-bought, try these: 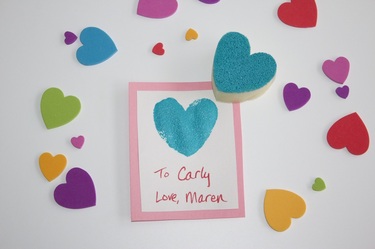 We happen to have foam shapes that we use when finger painting, but if you're handy with scissors and short on shapes, you could make a heart from an old kitchen sponge. I used finger paint to coat the sponge, pressed down, et voila. Then I simply pasted (I actually used double stick tape, but you can glue, too) the original square I cut out onto another colored sheet of construction paper. Your child can write the 'to' and 'from' names on it and leave as is, or embellish as he or she likes. 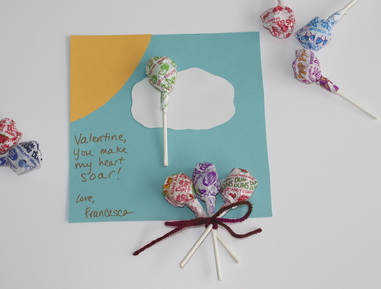 More construction paper and some left over lollipops here. But even if you don't have Dum Dums hanging around, they're only 10 cents each in the bulk bin, so it's really cheap. I cut out a 6 x 6 inch square of blue paper, a corner of a sheet of yellow paper to make the sun, and cut the cloud out of white paper. I glued the lollipops on with a bit of clear Elmer's to make it look like a balloon had escaped the bunch. I tied the yarn bow on after gluing, it was much easier than tying them first. Insert pun about soaring hearts, and you're done! 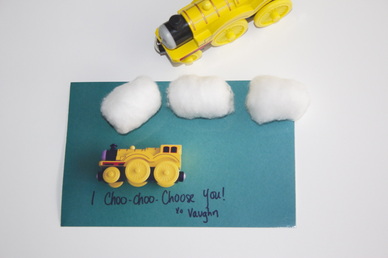 A take on one of my favorite valentines. This required the most work (i.e. tinkering with my printer). First I grabbed a toy train and a piece of green construction paper and wrote the message in black Sharpie. When you write your message, try to leave yourself at least a half inch border of blank space at the bottom. I propped up the train with a few small foam stickers so the wheels would look straight. I took a picture of the train on the paper and printed it out on 4 x 6 inch photo paper (make sure you choose the borderless option). Then I glued the cotton balls on the photo paper to look like the steam from the engine. If you don't want the valentine to be 3D, you could put the cotton balls on the construction paper and then take the picture before printing, getting basically the same effect. If you make any of these, let me know! images are my own
Xx a 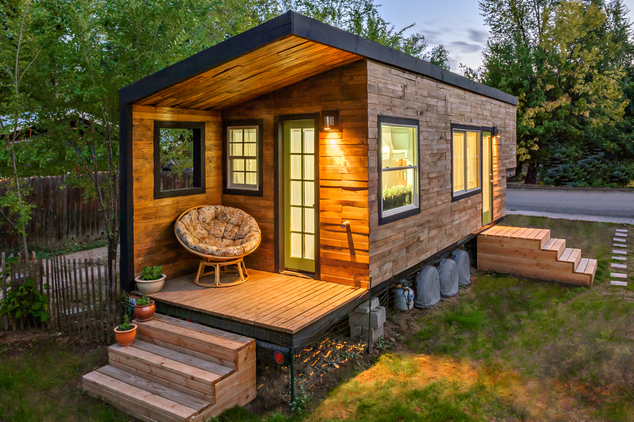
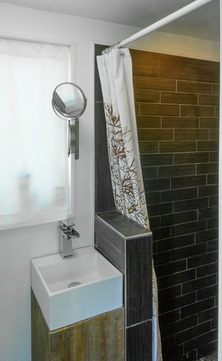
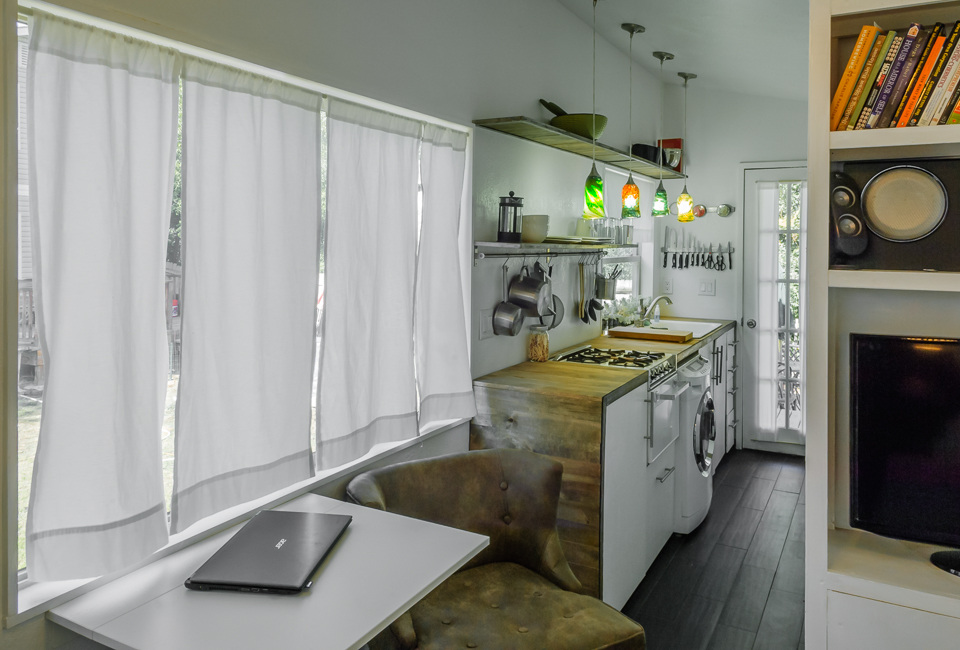
Yesterday I was going to share some beautiful ornaments I've come across over the last couple weeks, but then I got about one hour of sleep because I was up all night with a sick kiddo, so I readjusted my goals for the day. My designation of productivity was avoiding the stomach bug or whatever was at work that night. My daughter is better and as for me, so far so good. So, please look for the ornaments post tomorrow! I am, however, interested in sharing this extremely DIY project because I am in awe of this architect and her Tiny House (found via My Modern Metropolis). Architectural intern Macy Miller of Boise, Idaho, designed and built a house on a 24-foot flatbed trailer (didn't they have something like this on that one random episode of the NCIS: LA spinoff with the special team?). But in all seriousness, she lives in this small space--small being an understatement, as the entire living space is around 200 square feet. Miller had always dreamed of designing and building her own space, and living with only what she truly needed and jettisoning everything else. She also wanted to see if she could build her entire house for a year's worth of rent--about $10,000-$12,000--and teach herself about construction in the process. She was able to save enough money and pay for everything in cash, so she has no mortgage. She has been working on the house for two years, and though nearly complete, still has plans to do a bit more work. As I said, I'm in awe, mostly because I don't think I'm disciplined enough to be able to live in such a small space, though I absolutely would love to able to reduce the amount of stuff I have that isn't meaningful or useful. Maybe if I were single, but somehow I think I'm too sentimental to be able to pare it down to this level. And like anyone who has owned a house in the last several years, in particular, it would be nice to not be beholden to a mortgage payment! Check out her process and other really interesting images at her own blog. She explains the technical choices she made and the challenges she's faced. The house is really cute, modern, and minimal, as it would have to be, but it doesn't seem claustrophobic or too stark. 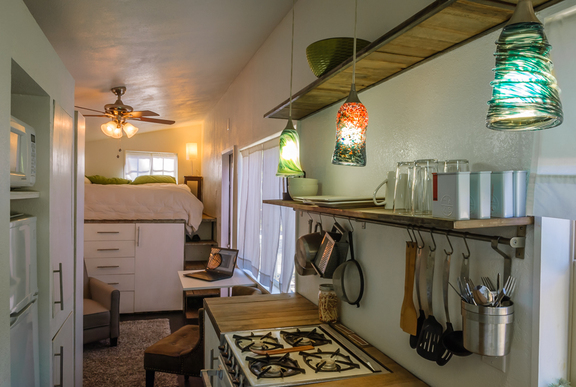
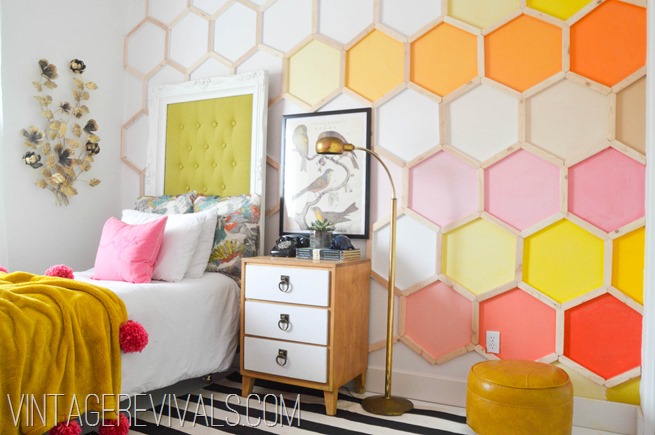 In middle school and high school, I realized that though I was weird, quirky, creative, and some of my closest friends were art kids, I was not an art kid. There was some overlap, and I tried to take more art classes in college, when I could fit them in. But as much as I love visual arts, images, and design, I am better with words.
Similarly, as an adult, I am not an artist, stylist, or designer, but I work with them, write about them, and get to be partially immersed in that world. I'm trying to learn more from them. The creativity is always inspiring me to look at things differently and sparks my own ideas. When this image from Vintage Revivals (above) happened to pop up in my stream on Pinterest, I was very intrigued. 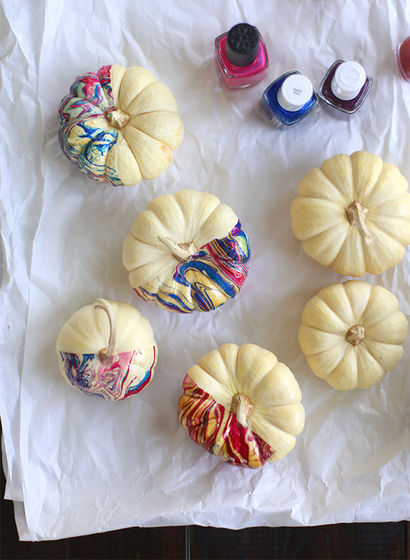
Pumpkins seem to be anything but orange these days. This weekend we're going picking with the girls and my parents, and I've been getting inspired by the pumpkin decorating projects I've seen online. Here are my favorite looks for pumpkins right now: The marbled pumpkins (above) from Say Yes to Hoboken are so sophisticated-looking and grown up, but easy enough to do with kids and a bit of supervision. And options are endless since nail polish colors are more than plentiful. 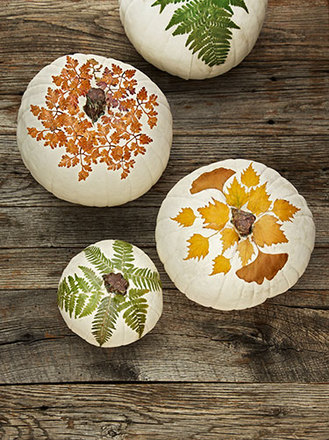
I love the patterns and colors on these decoupaged botanical gourds created by Country Living, especially the one on the top left with the small orange leaves. 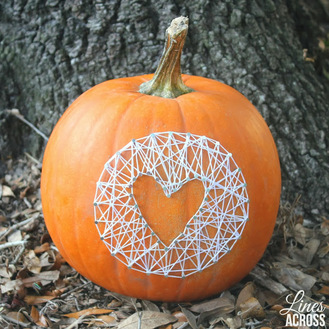
Inspired by this string art pumpkin from Lines Across, I think I'd actually be a little more traditional and use the nails and string to create a large spider web, then glue a plastic spider onto it. I was surprised to find no pictures online of this idea. You could even paint the pumpkin black, apply the white web (or spray it silver before tying), and get a glow-in-the-dark spider.
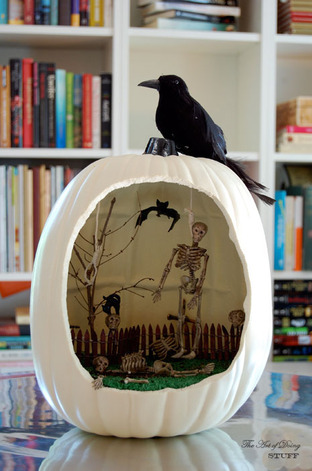
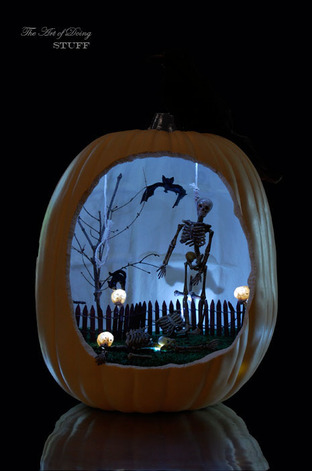
Maybe it's the school nerd in me, but I've always loved dioramas. So it's no surprise that I love the idea of a diorama set up in a hollowed out pumpkin. This scene from The Art of Doing Stuff, definitely captures the spirit of Halloween without being too scary or gory. This is obviously the most time-intensive, but how fun would it be to pick out and arrange all the tiny accessories inside? I like the little skeleton hand creeping out at the bottom! 
I always love a little edge, even on seasonal fruit. A studded pumpkin by Small Shop feels a bit punk inspired and takes very little time to achieve.
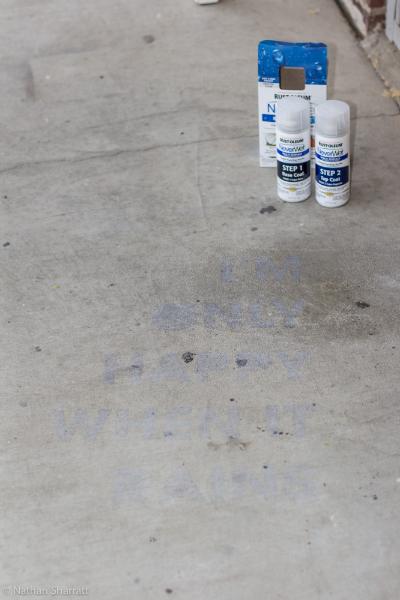
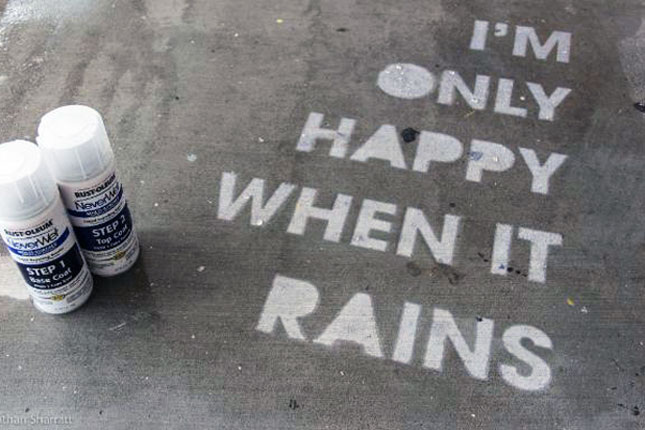
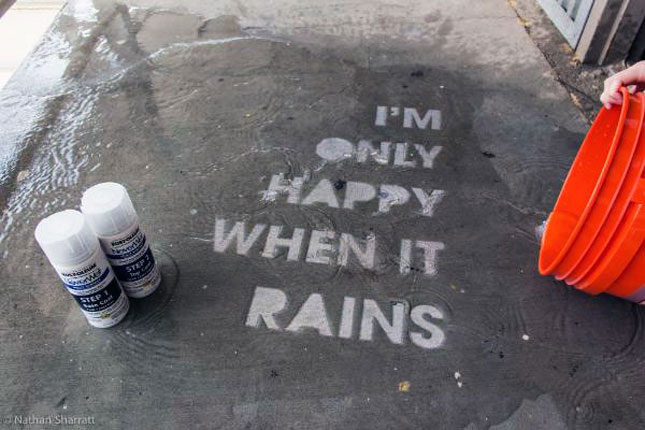
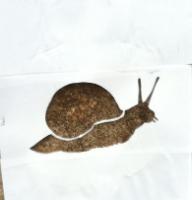
images via say yes to hoboken, country living, lines across, the art of doing stuff, small shop Xx a  I don't know about where you live, but it's been pouring here in CNY (as it pretty much did all weekend), with a tornado advisory thrown in for fun. Rain can sometimes be a total drag, but I love this creative idea I saw on Brit + Co. It reminds me of the interesting pictures or slogans I'd see spray painted randomly on the sidewalks in New York, but with a sort of Invisible Ink quality. It's a surprise for when you might need an extra smile. Rust-Oleum has a product called NeverWet, which is a two-step moisture repelling system. Introduced as clever Home Depot contest entries (here, with tutorial and here), the idea is to use NeverWet and a stencil to spray your sidewalk, porch, or anywhere really, with a design that will only appear when the rest of the ground is saturated with water. The original idea was to create street art, but if you're feeling less public, it could be a great project to do with kids on a driveway or back patio. Rain puns are an obvious choice, but I wonder what I would stencil. Probably something cryptic and silly to make myself laugh—like the first half of a coded phrase from the original Get Smart: The blue sun melts the red snow.
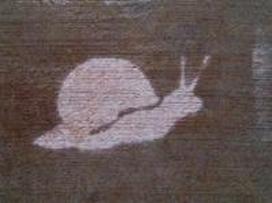
The snail image is adorable. The fun is that it can be as simple or elaborate as you want it to be.
It also occurred to me that if your child is into spy stuff as much as I was (am), you could do something like this as part of a spy-themed party or activity. And if you don't want to keep it forever, when the top coat finally wears off and the water no longer beads you can skip reapplication, or according to Rust-Oleum's site, you can wipe the surface with mineral spirits. What design would you spray on your sidewalk? 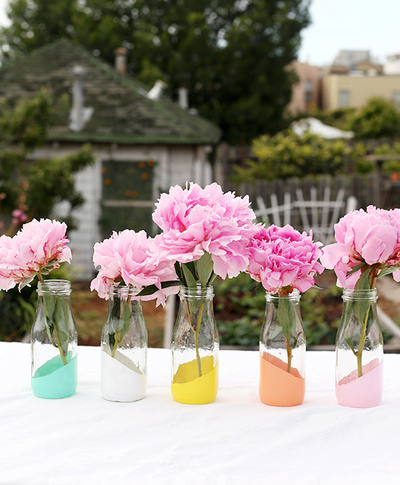 Over the weekend, I finally started working on the decorations for our 10th anniversary vow renewal taking place this Friday. I'm kind of freaking out at how soon all this is happening. I don't feel ready, though a lot of it is falling into place. The weather even looks like it might be nice enough to do the brief ceremony outside. We would really like that since ten years ago it rained until right around when our ceremony ended. We didn't get to have any of the cocktail hour outside, though we did get some great photos because of the overcast sky. Bonus: no squinting! None of the DIY decorations I'm doing are revolutionary, by any means. I'm sure it will look a lot like what you've seen on Pinterest, but I'm limited by time and budget, and it's a small intimate gathering. I know I make it sound like I never do anything DIY, which actually isn't entirely true. It's just that most of what I have done has been stationery related. I did every bit of stationery for our wedding, and spent hours and hours cutting out japanese wrapping paper into small squares to make pockets onto larger squares of card stock. Into these pockets went another square with the name of the table people were sitting at, and the guests' names were written at the top. Also all the names of the tables were named after squares in Manhattan: Madison Square, Washington Square, etc. I was really into the theme... At any rate, we started the table decor and the dipped tealight holder came out pretty well, so taping and spraying the rest is on the agenda today after I work on captions for an article. Speaking of dipped and DIY, I'm glad I'm not the only one still into this trend. Here are three DIY dipped projects that anyone can do. Click the images for the tutorials.  Pastel Dipped Milk Bottle vases These dipped bottles are similar to what I'm doing, but mine are all in gold. I love the palette Liz from Say Yes to Hoboken chose on these. 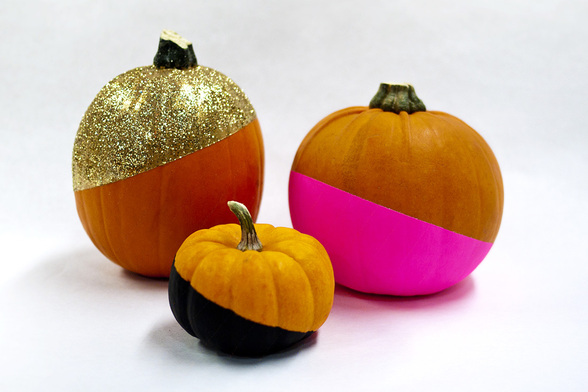 No-Carve Glitzy Color-Dipped pumpkins Carving pumpkins is fun, but this idea from Brit + Co. would really stand out on a stoop or front porch! 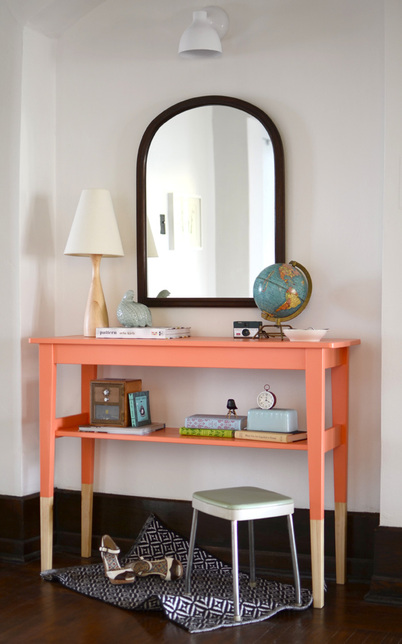 SVALBO sideboard hack This project is a little more involved because Emily, of The Sweet Beast, had to remove pre-existing supports for a lower shelf. It's still a really doable project and inexpensive. I love how glossy the finish looks with the Polycrylic coat she applied at the end.
I'm really not a good DIY-er, even though I often come up with projects I think I'd like to attempt, which are probably pretty easy in execution. There are a few reasons for this.
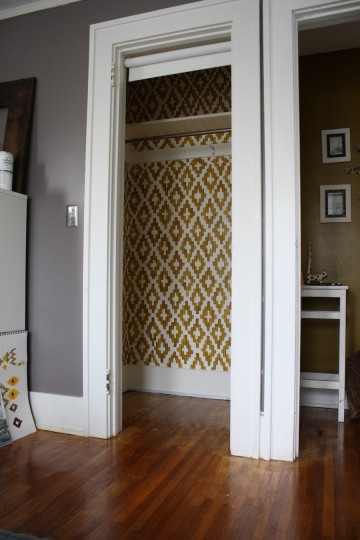
A. I am a bit klutzy and I have sometimes questionable hand-eye coordination (I blame my parents for not buying us video games. Not really. Only a little.) 2. I'm a perfectionist. Relating to the klutzy bit, if I tried to do some of these things myself, I would never feel like it was "right," and I would constantly start over until the swearing became too much for others to bear or until someone stopped me. D*. I'm a very impatient person. A perfect storm—all of my quirks (we'll generously call them) make me not a great candidate for doing large projects on my own, or even with my husband. We work really well together, except for when we have to do "work" together. Or navigate, but that's a different story. I fully admit to being a person who would rather pay a professional to handle things like painting, wallpapering, putting in new backsplashes, or reno-ing a bathroom. I have painted several rooms though, so it's not impossible. But, I was very picky about it and after finishing, my eye targeted any visible streaks and I can always spot that stray paint brush bristle that lodges itself defiantly in the middle of the wall and you don't notice it until it's far too late. So needless to say, when someone has done a fantastic DIY project, I'm in awe of their talent, creativity, and patience. While searching for other things, I happened to come across this ikat closet. It looks as though it could be wallpapered, but it's really a stellar DIY paint job. |
#checkout this blog with shop-themed puns
archives
August 2014
categories
All
© 2014 | mrkt
|

 RSS Feed